
Tubeless Rim Tape Width: The R-Angle Chart (2 Options) – Light Travel Cycling
Tubeless Rim Tape Width: The R-Angle Chart (2 Options) – Light Travel Cycling
Your tape width in one sentence: tape the bed only — internal width + 2–3 mm; tape 2 mm up the R-angle — internal width + 6 mm. When in doubt, double-layer it.
That's the whole secret. But before you check the table, spend 10 seconds finding your rim's R-angle — it decides which column you read and where the tape edge should end.
First, find the R-angle
"R" is radius — the fillet where the rim's bead seat meets the sidewall. Run a finger across the rim bed and up the sidewall: the curved transition between them is it. It matters because it's the highest the tape should ever climb: edge the tape onto the R-angle by about 2 mm and you get a more complete seal; go past it and you create bead-lifting and slow-leak problems instead.
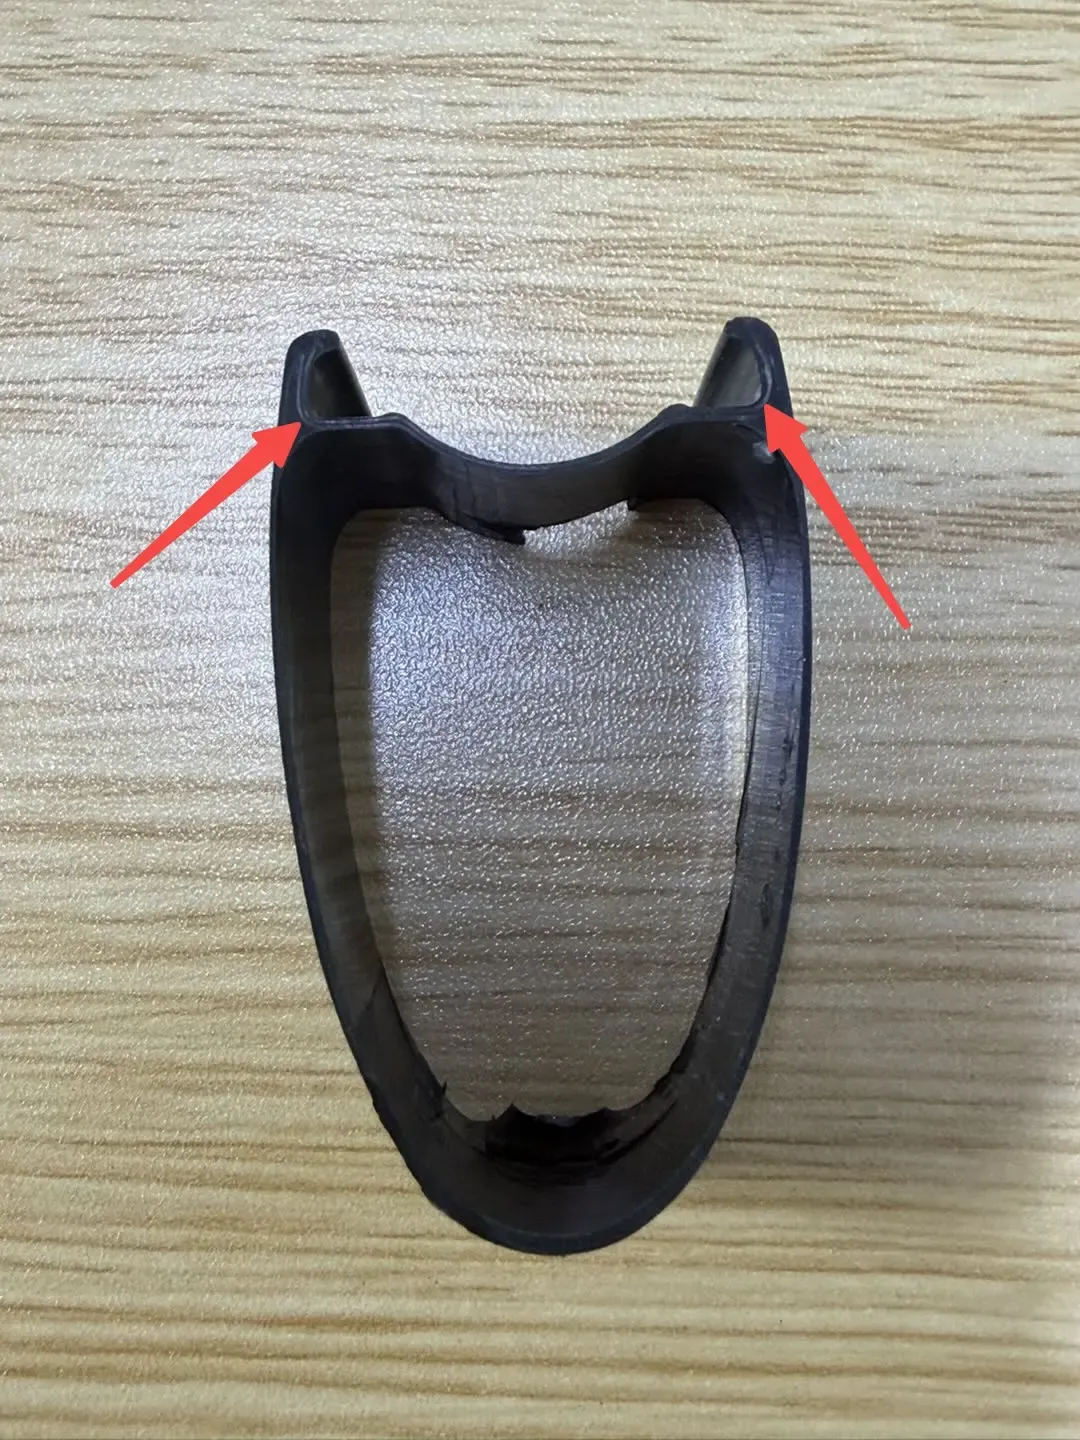 Photograph-of-a-rim-cross-section-with-a-red-arrow-pointing-to-the-transition-R
Two ways to tape, two columns in the chart:
· Bed only (the simple way): tape stays on the rim bed, edge before the R-angle. Width = internal + 2–3 mm. Easier, more forgiving, what most riders should do.
· Up the R-angle by 2 mm (the advanced way): tape edge climbs just onto the fillet for a fuller seal. Width = internal + 6 mm. Demands precise centering and tension — experienced hands only.
The chart
Tape width | Up the R-angle — single layer (fits rim internal width) | Bed only — single layer (fits rim internal width) | Double layer (fits rim internal width) |
19 mm | 13–14 mm | 16–17 mm | 17-22mm |
21 mm | 15–16 mm | 18–19 mm | 20–25 mm |
23 mm | 17–18 mm | 20–21 mm | 22-30 mm |
25 mm | 19–20 mm | 22–23 mm | 25–33mm |
27 mm | 21–22 mm | 24–25 mm | 27–37 mm |
30 mm | 24–25 mm | 26–28 mm | 30–40 mm |
32 mm | 26–28 mm | 29–31 mm | 35–45 mm |
35 mm | 29–30 mm | 32–33 mm | 40–50 mm |
How to read it: "internal width" is the distance between the bead seats — printed on the rim or in its specs. Your rim brand's official recommendation always beats any chart, including this one.
Why the two single-layer columns differ: climbing onto the R-angle wraps the tape edge around the fillet, which eats about 4 mm of width — hence internal + 6 mm for that method versus + 2–3 mm for bed-only. Too wide piles up the sidewall; too narrow exposes spoke holes. The two methods genuinely need different tapes.
An honest caveat about taping to the R-angle
Reaching the R-angle is not the only path to a good seal. The tape's real job is sealing the spoke holes — and that job is done when: every spoke hole is fully covered with at least 5 mm of bonded tape between each hole edge and the tape edge, and both tape edges sit flat with no channels for air to creep along. Bed-only tape with solid adhesion seals fine; R-angle tape laid loosely still leaks. Method matters less than execution — which is why we only recommend the R-angle route for experienced hands.
If you tape up the R-angle: the technique notes
· Dead-center the tape. Off-center means one edge climbs while the other exposes spoke holes.
· Tension without narrowing. PET tape needs continuous stretch to conform — but over-stretching makes it narrower than its label.
· Edge at R-angle + 2–3 mm, no higher. Never wrap the full sidewall.
· Press the fillet. Thumb or roller, one full pass along the R-angle to squeeze out air.
· Finish: overlap 5–10 cm opposite the valve; pierce (don't tear) the valve hole.
One layer or two?
Double layer — the default. Road and gravel pressures, first installs, older rims, oversized spoke holes. Two layers stop tape extruding into spoke holes under pressure and forgive imperfect cleaning. It's what the major brands ship as standard.
Single layer — specific cases. Low-pressure mountain setups, quality PET tape, careful hands. Works when everything's done right — which is why it's not our default.
The myth worth killing: extra layers do NOT lift the bead or cause blowoffs. Properly laid tape makes the bed smoother, not bumpier.
The five mistakes that cause tubeless leaks
1. Reusing old tape. Adhesive ages; carbon mold-release residue eats it faster. Stiff, cracked or patchy = replace, every unseating.
2. Electrical tape "because it's tape." Wrong stretch, wrong temperature rating, dissolves in sealant.
3. One layer on high-pressure road. Road pressure is exactly where single layers extrude into spoke holes.
4. Tape past the R-angle. +2 mm onto the fillet is the ceiling, not a suggestion to wrap the sidewall — past the R-angle, tape lifts beads and leaks slowly.
5. Judging by thickness, not material. PET beats PVC for pressure and sealant survival — PET-only on carbon.
Quick answers
My tape is 2 mm wider than internal width — okay? For bed-only: exactly right (+2–3 mm). For the R-angle method: not enough — that wants +6 mm.
How do I spot good tape? Even adhesive, stretches and rebounds without cracking, peels off intact. Ours is PET-based in five widths (18/21/23/25/27 mm) — match to the chart above.
Tape or sealant? Different jobs: tape seals spoke holes, sealant seals tread punctures. Sealant never fixes a tape problem.
Special tape for carbon? Yes — PET that resists mold-release residue; double-layer if you've had slow leaks. Carbon beds are smooth; adhesive chemistry matters more than on alloy.
How long does it last? Double: 3–4 tire removals or 18–24 months. Single: 2–3 removals or 12–18 months. First to arrive wins. Curled edges, hardened adhesive, or sealant-soaked tape = replace now.
Before you start: 60 seconds of prep
Clean the bed — old tape, residue, sealant gunk, oil — isopropyl wipe, fully dry. One boring step; the difference between tape that holds two seasons and tape that peels by Friday.
Save this page: the chart covers every tubeless setup you'll ever tape. Related: rim width and tire size pairing | hooked vs hookless rims | tubeless valves
